Artful Academia
The musings of a landscape painter, art teacher, and art history lover
A beginner's lesson in watercolor washes for students and teachers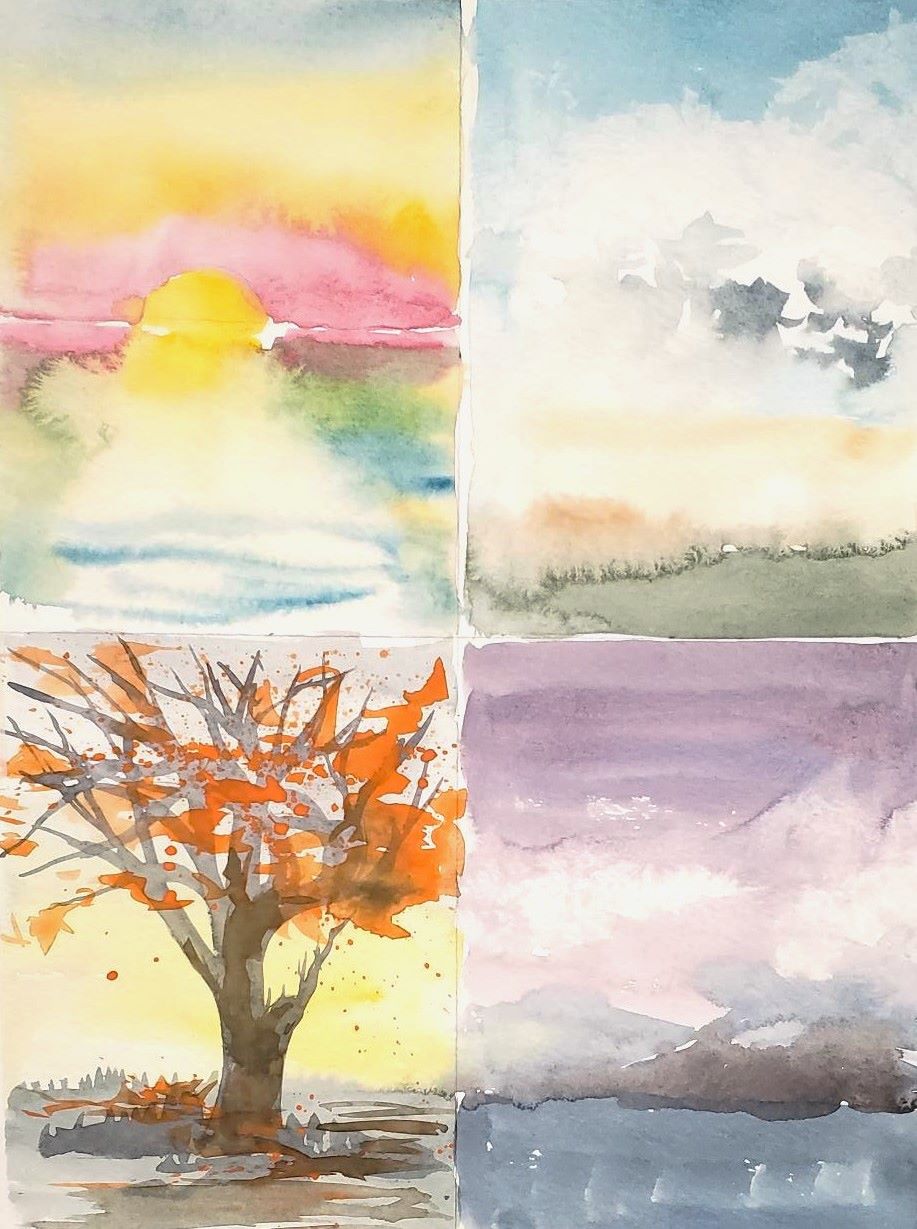 This lesson is designed for beginning watercolor students and teachers. It is perfect for grade levels 8-12 but is also suitable for adults and younger students. As an art teacher, I have spent a lot of time searching for basic watercolor lessons to provide for my students. However, I am usually disappointed with the choices. The lessons are either too childish or too advanced. Therefore, I set out to create my lesson that would act as an introduction to watercolor. It mainly focuses on wash techniques. 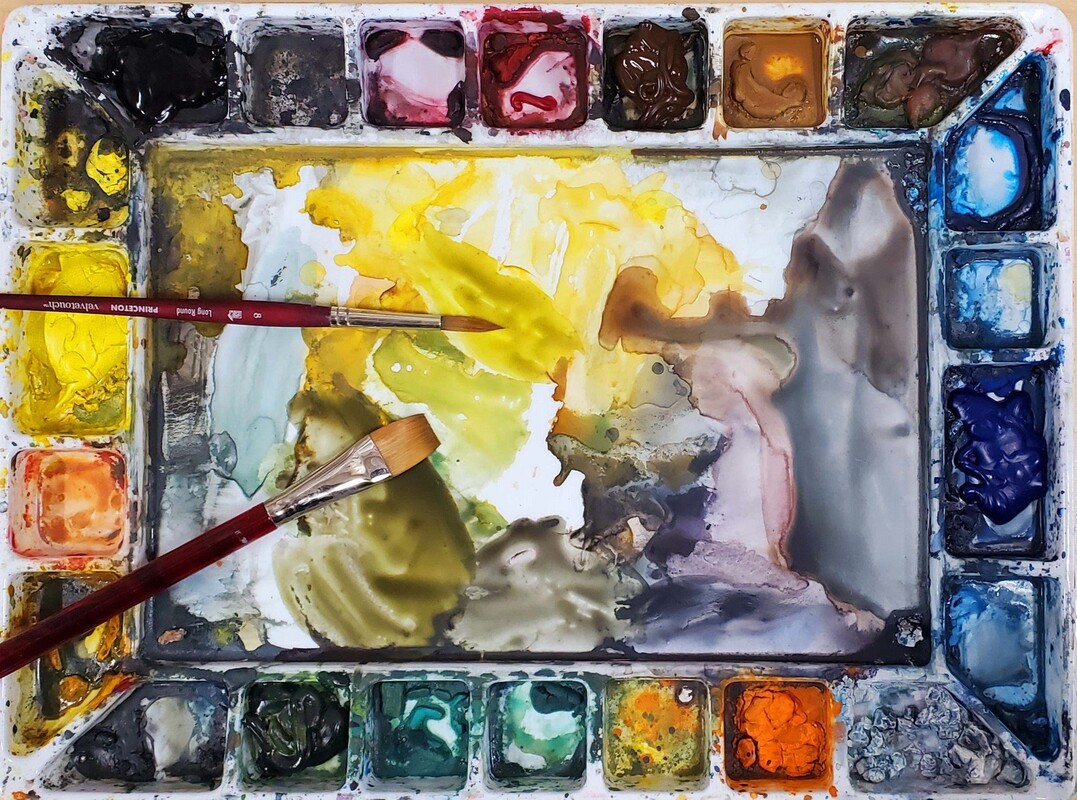 A little background on watercolor painting: This medium has been around since at least the Renaissance but dates back to the ancient Egyptians and even the early Paleolithic cave painters. The famous Northern Renaissance artist, Albrecht Durer, was known to create beautiful studies in watercolor. The binder for watercolor is gum Arabic, traditionally harvested from acacia trees in Sudan. The binder is mixed with powdered pigments and a little glycerin to make the paint transparent and fluid. After they have dried, watercolors can be reconstituted with water. This is why we can use watercolor from cakes or from tubes. However, this also makes watercolor paintings fragile and thus, requiring glass over them when framed. Up until about the 18th century, watercolor was not seen as a truly viable art form. It was used mostly for botanical studies, travel journals, and sketchbooks. However, soon it began to be used broadly, to stand on its own as a unique and viable medium. Three distinguished English artists are recognized for their pivotal role in elevating watercolor as a distinct and sophisticated painting medium. These remarkable individuals are:
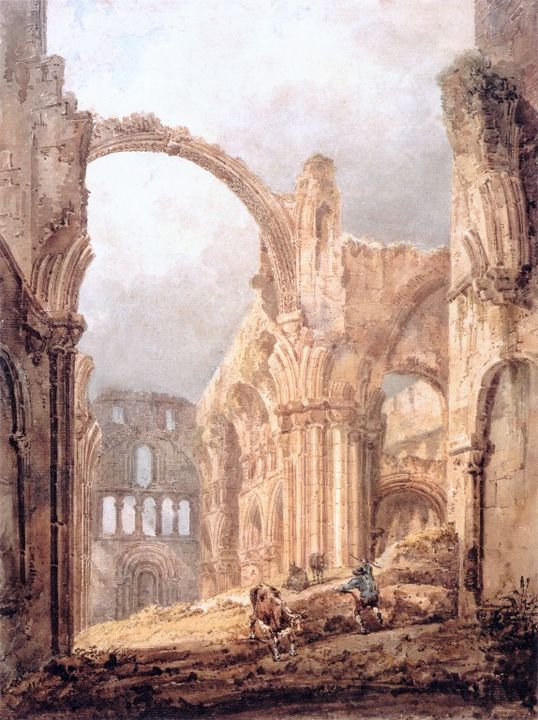 Thomas Girtin, "Interior of Lindisfarne Priory" (1797) Public domain Watercolor Lesson PlanUnderstanding how to apply a wash and manage your water in watercolor painting is essential. This lesson will provide instruction on washes and give students a chance to practice their brushwork and color mixing. Vocabulary:
Materials Needed:
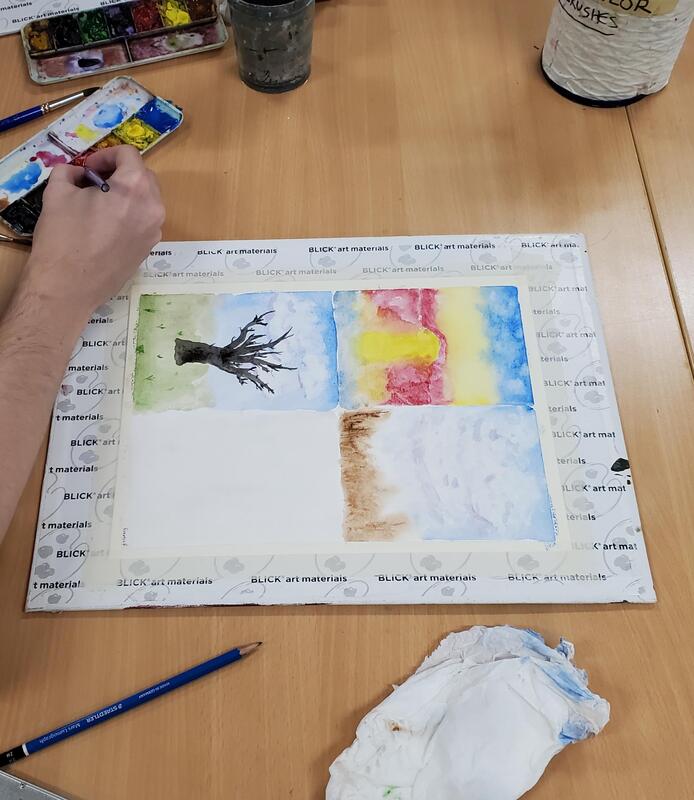
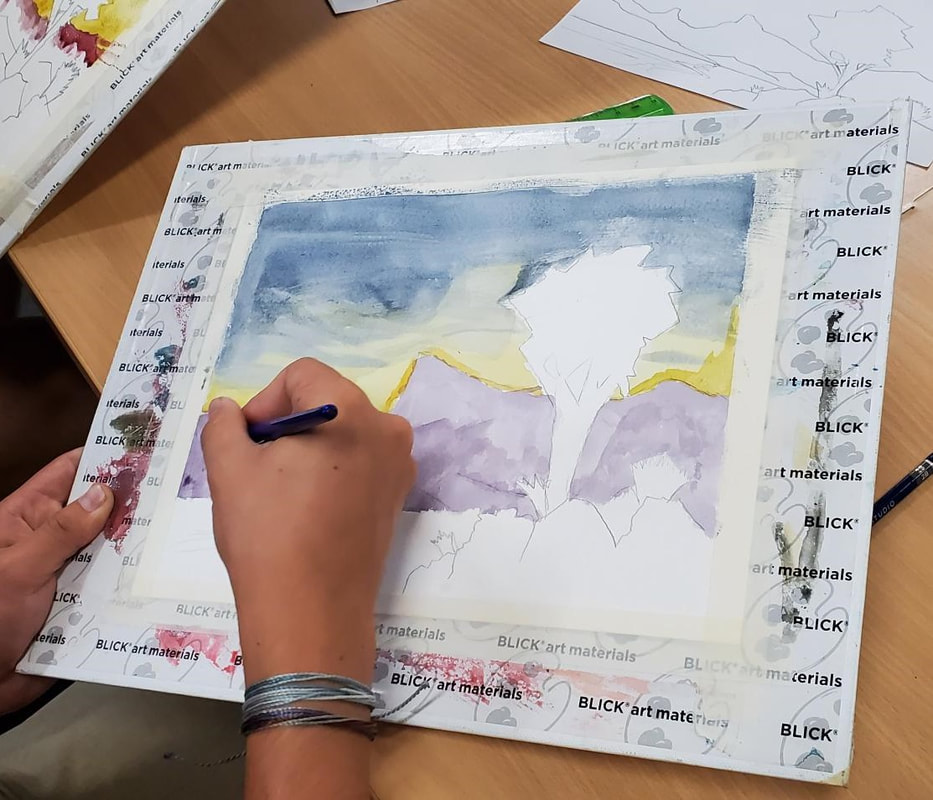
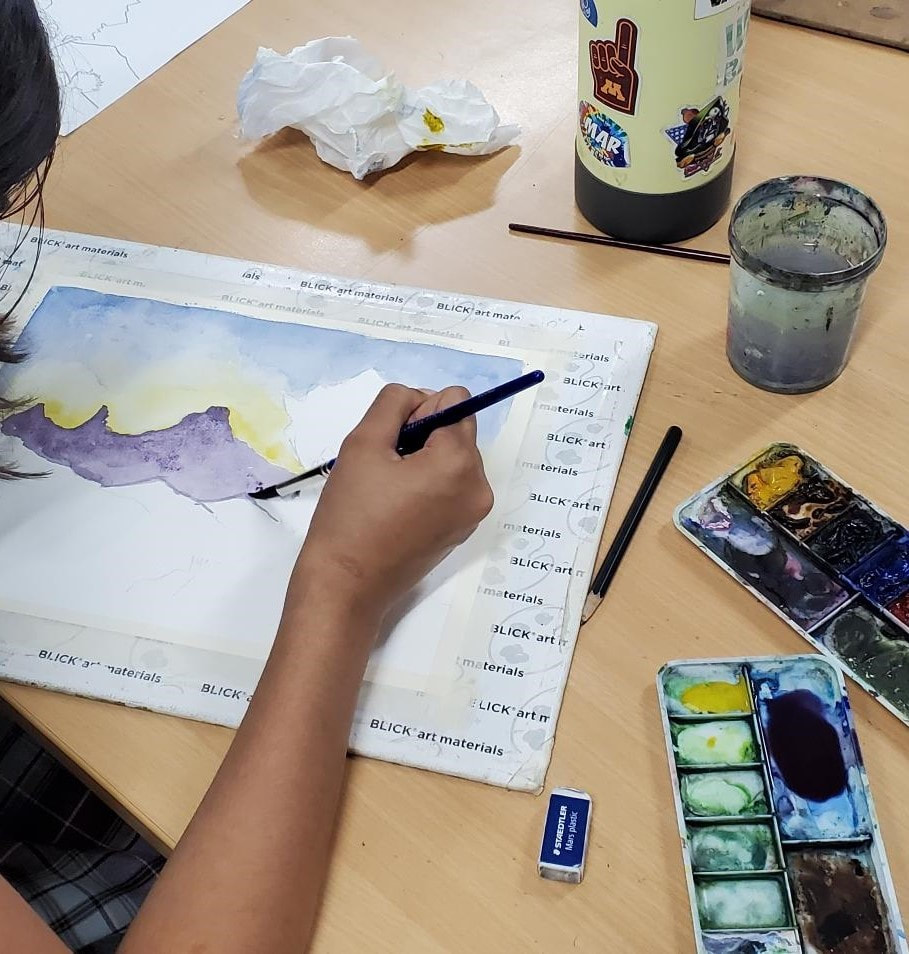
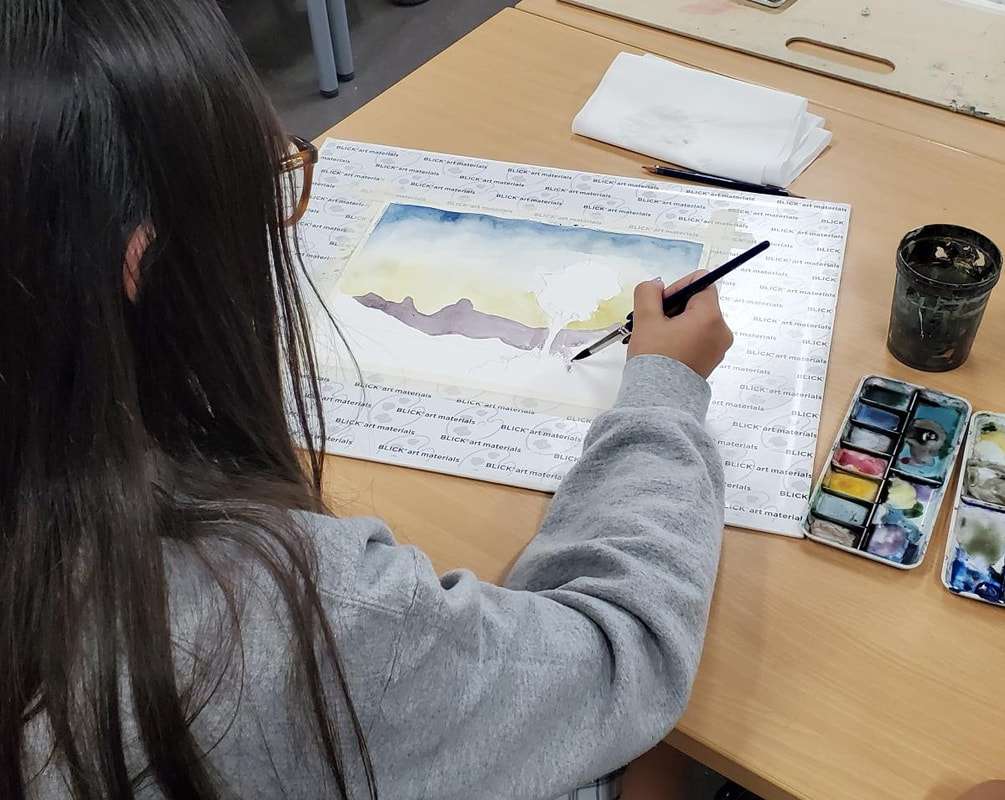
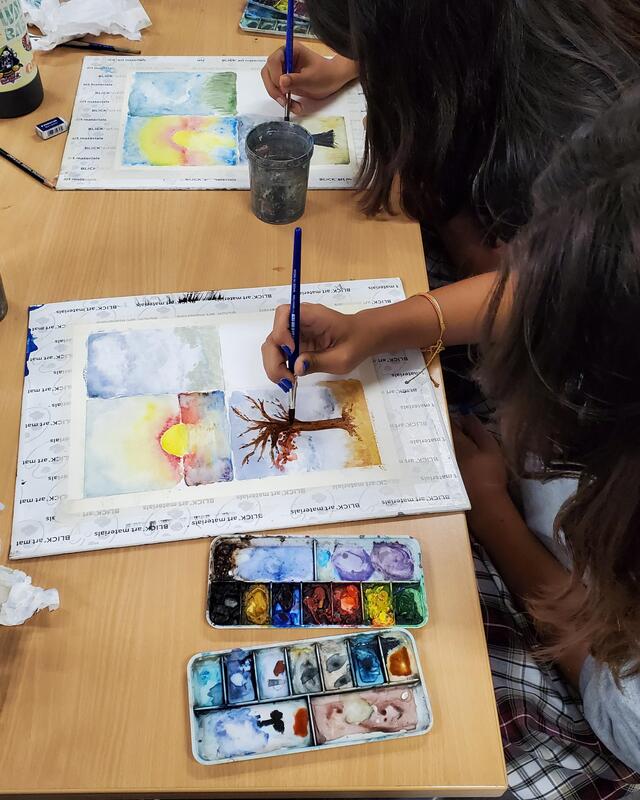
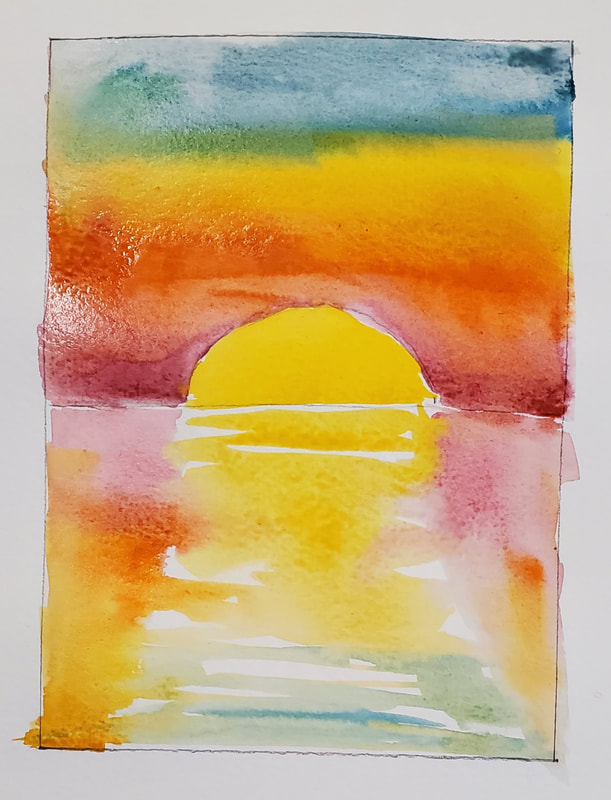 Exercise 1 (Sunset): Step 1: Get a sheet of watercolor paper and tape it down to a hardboard. Use masking tape to tape around all the edges. Do not remove this tape until the entire painting project is complete. By taping the edges in this way, you are ensuring that the paper will dry flat. Step 2: Use a ruler and divide your page into four equal quadrants. Step 3: In the first quadrant, draw a horizon line and place a half circle on top of the horizon line to represent a sun setting on water. Get ready to paint: You will need to have your paints and paint mixing tray out, along with your brushes, a paper towel, and a cup of water. Give yourself plenty of room and remove any nearby items that might be damaged if you accidentally turn over your water cup. Step 4: Use your flat brush and pure water to paint water in the sky area of your drawing. Paint the water around your sun shape. The paper should be damp, but not have pools of water on it. You can blot excess water with your paper towel or a dry brush. Step 5: You need to move quickly now, before the water dries. With just a few strokes, apply red paint along the horizon line and around the sun shape. It should blossom into the already wet paper, creating soft edges. Step 6: Before your water dries, add a few strokes of orange paint above the red paint. The orange paint should blend by itself into the red paint and blossom out. Step 7: In a similar fashion, add a few strokes of yellow above the orange. Step 8: Finally, add some blue into the sky. It will blend down into the yellow and might make some green, but that is okay. Sunsets often have a little blue-green in them as the yellow light blends with the blue light. Make some adjustments: At this point, you can do a little brushwork to fill in any areas that did not work out or blend a little, but be careful! Don’t overwork your painting. Pro Tip: Many, maybe even all, new watercolor artists tend to overwork their paintings. When applying watercolor paint, try to use a limited number of strokes and don’t go back and forth over it. If you start to see little dark balls of paper, you are overworking it and need to stop. It is essential for the watercolor always to remain transparent and best to just let the watercolor paint do what it naturally wants to do with limited intrusion. Step 9: Allow the top part to dry for a few minutes. Then paint in clean water around the edges of the lower portion where the sun’s reflection will NOT be. Step 10: Repeat the steps you took to add color to the sky, working from red at the top down to the blue at the bottom. Work quickly while the water is still wet and don’t overwork it. Step 11: Allow your bottom portion to dry for about five minutes. Then, if your top portion and dry portion are suitably dry and not shiny looking, paint yellow paint directly to the sun area. You do not need to wet the area first. Step 12: This part takes a little finesse. Work the yellow paint side to side in the area of the sun’s reflection, leaving lots of white gaps for the glistening sun. Then add a few swipes of blue at the bottom. That’s it. You are done with that exercise! 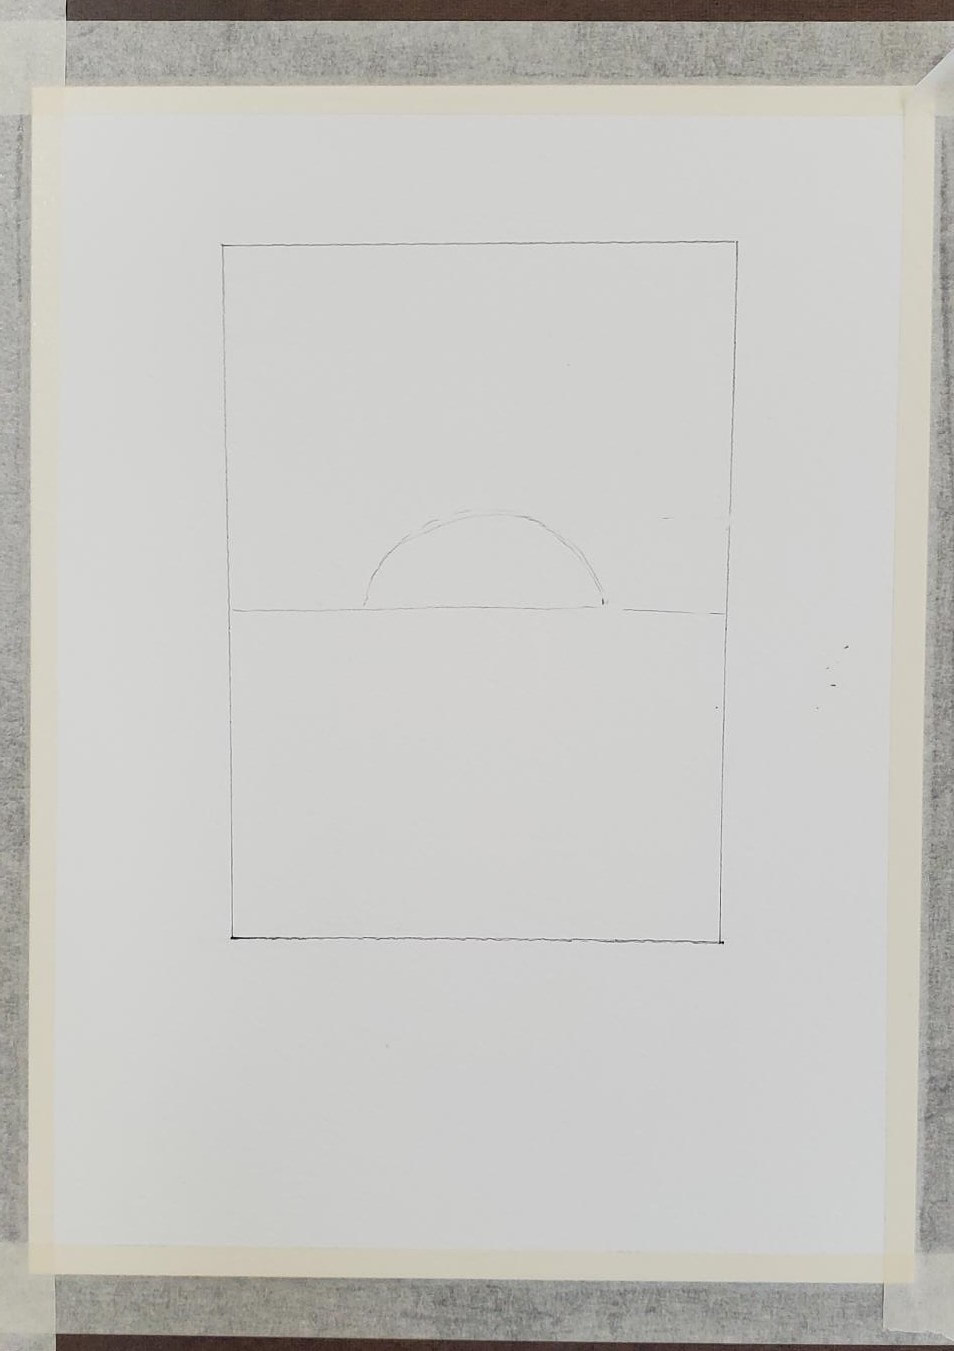 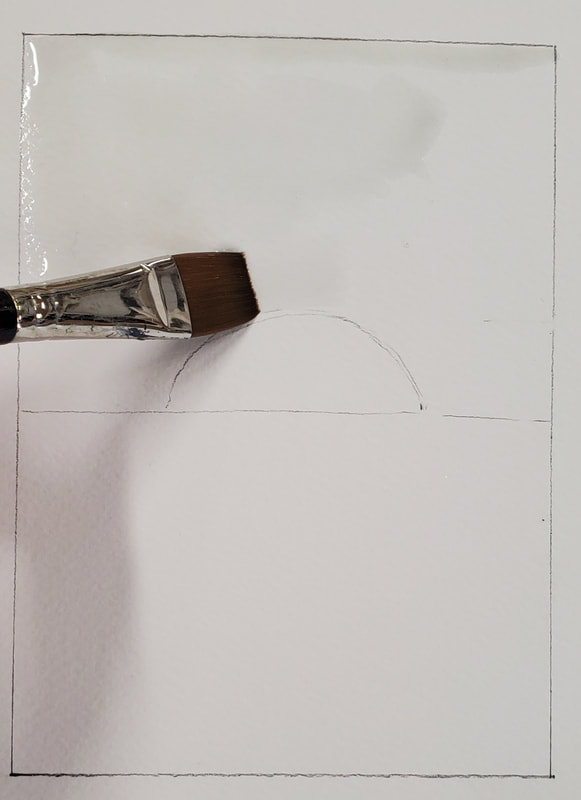 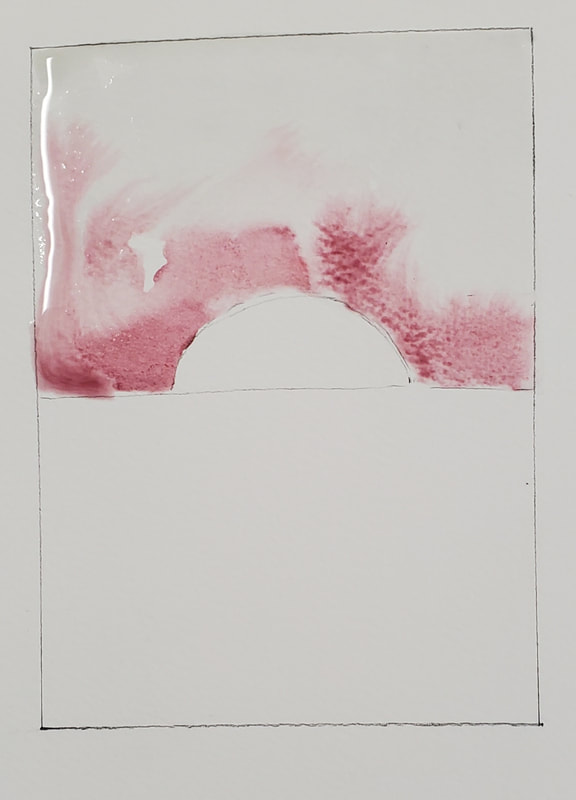 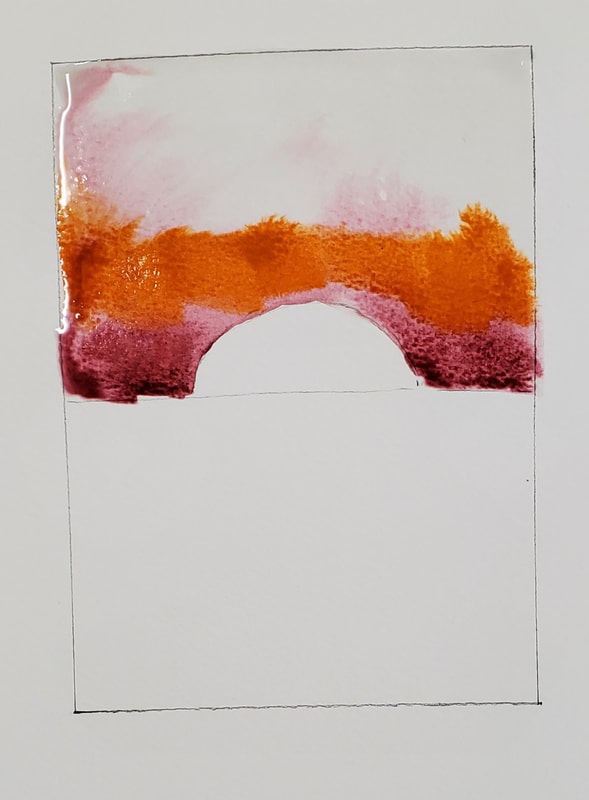 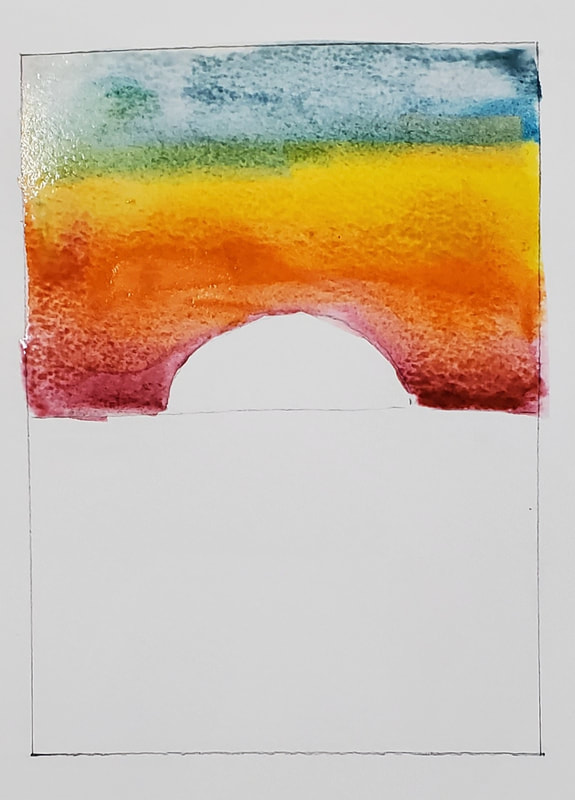 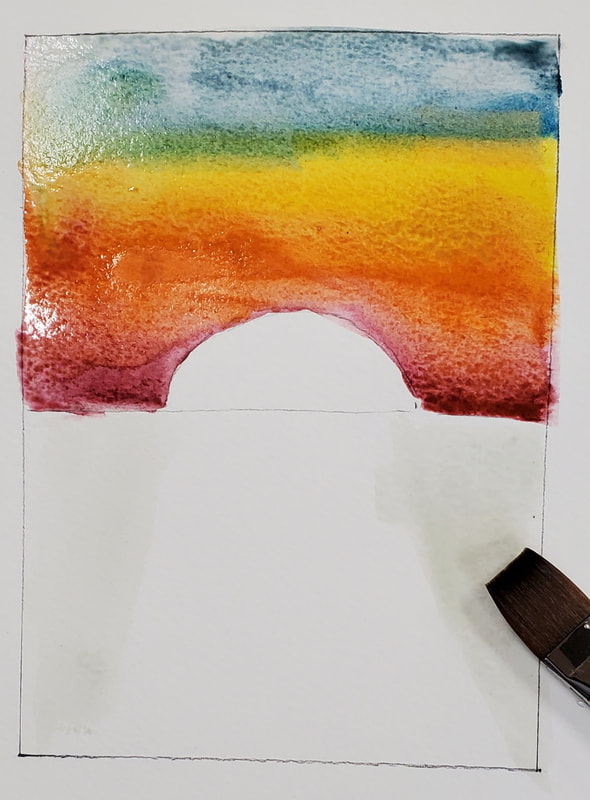  Exercise 2 (Clouds): Step 1: Select your next quadrant on your paper and draw a low horizon line. Step 2: Create a mixture of blue and black in your mixing tray with an emphasis on blue. Step 3: Apply clean water to your sky area and then wash in your blue mixture. Step 4: Before your watercolor dries, quickly scrunch up a paper towel into a ball and then press it firmly into your sky. This will lift out a textured area for a cloud. Repeat this a few times until you have a cloudy sky. Step 5: Create a mixture of blue and brown and quickly paint in a foreground. It is okay if the sky is not dry yet and it blossoms up a bit. That will simply make your picture seem more rainy and damp. Step 6: Go back to your sky now that it has had a few minutes to dry. Use your sky color or mix up a little violet and add a few brushstrokes to indicate the darker underside of your clouds. Use a paper towel to soften edges as you see fit. Try not to overwork it. That’s it; you are done with exercise 2!  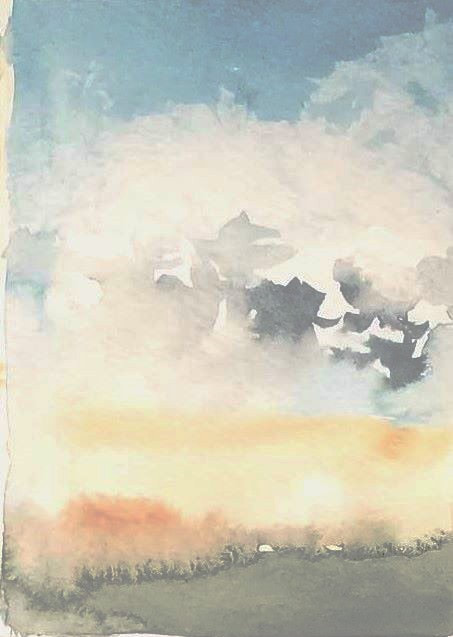 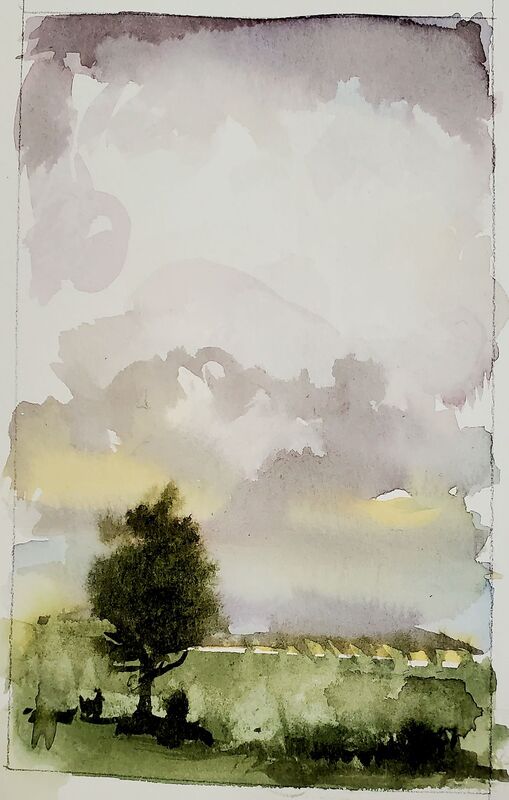 Exercise 3 (A Tree): Step 1: Following the steps you have learned previously, create a simple landscape with a low horizon line. For my example, I used yellow ochre for the sky and then added a little gray made from blue and black, to make an autumn-looking sky. Once you have completed your sky and foreground, let it dry completely. Step 2: Now that your drawing has completely dried, use your pencil to lightly outline a tree. Try to make your trunk get smaller as it goes up and create many forks with your branches. Step 3: Using a mixture of black, blue, and brown, create a dark warm color. Next, use your round brush and carefully paint in your tree branches. Pro Tip: Practice painting your tree on a separate sheet of paper first. Paint the branches from the base or thickest part first and then lessen the pressure on your brush as you move toward the tip of your branch. Practice makes perfect! Step 4: Let your tree dry. Then, mix up a bright mixture of orange paint on your tray. Dip your brush in and hover it over your tree limbs. Then use your forefinger on your free hand to flick the tip of the brush causing the paint to sprinkle over your limbs. Add a few drops to the ground as well, to mimic fallen leaves. Again, it helps to practice this on a separate sheet of paper first. 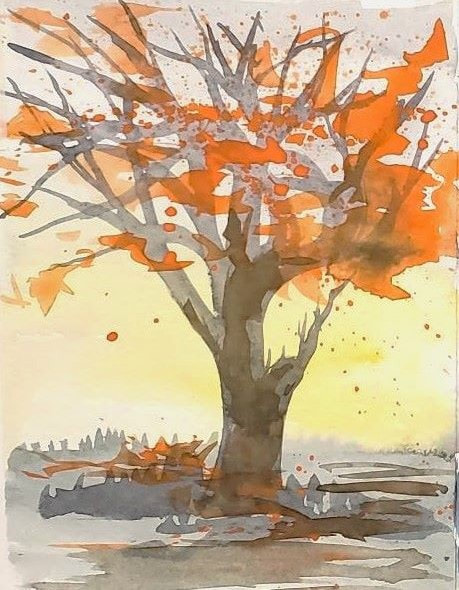 Exercise 4 (Your Choice): With this final exercise, apply what you have learned. Create a simple landscape using washes of watercolor paint. Remember, don’t overwork it, but do have fun! For the example below, I chose demonstrated how to paint a night sky with some deep purple colors. 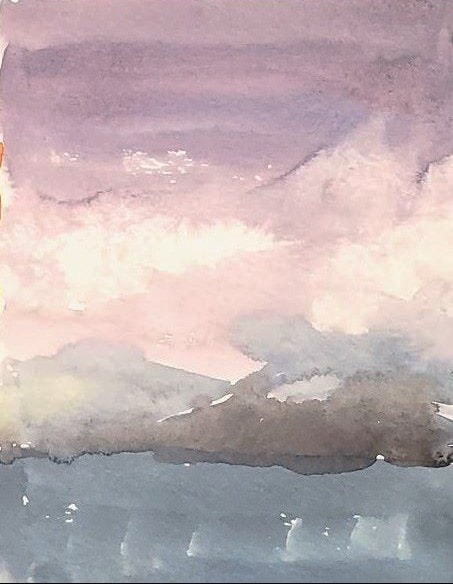 This lesson plan provides a comprehensive guide for beginners to start exploring the world of watercolor painting. It covers essential techniques, materials, and exercises that gradually build skills and confidence in using watercolors. Students and teachers alike can use this plan to embark on a creative journey in the medium of watercolor. This lesson is free to educators and students but may not be duplicated or sold for commercial use. Enjoy your painting! Watercolor Lesson QuizCheck your understanding with this short quiz. At the bottom, you will find a PDF of this quiz that you may download for your students. Watercolor Vocabulary and Art History Quiz 1. What is the primary focus of a watercolor wash in painting? a) Adding fine details b) Creating textured areas c) Covering a large area with a consistent tone d) Outlining the subject 2. What does "wet-into-wet" refer to in watercolor painting? a) Applying paint to a dry area b) Applying paint to a wet area c) Mixing different colors of paint d) Applying paint to a canvas 3. Which of the following artists is recognized as the "pioneer of English watercolor"? a) Paul Sandby b) Thomas Girtin c) Joseph Mallord William Turner d) Albrecht Durer 4. What is the primary purpose of the binder traditionally used in watercolor paint? a) To make the paint opaque b) To create a glossy finish c) To make the paint transparent and fluid d) To make the paint dry faster 5. What is the main advantage of taping the edges of watercolor paper during painting? a) To make it easier to frame b) To prevent the paper from getting wet c) To ensure the paper dries flat d) To add decorative borders to your painting 6. What is the result of overworking a watercolor painting? a) Enhanced transparency b) Improved texture c) Muddiness and loss of transparency d) Brighter colors 7. Which term refers to using minimal water and a small amount of paint to create textured and irregular lines or shapes in watercolor? a) Wet-into-wet b) Drybrush c) Lifting d) Wet onto dry 8. What is the primary goal of applying a wash in watercolor painting? a) To add fine details b) To clean the paper c) To establish a consistent texture and tone over a large area d) To emphasize the outlines of the subject 9. What term describes applying watercolor paint over an area of the paper that is currently dry? a) Wet-into-wet b) Drybrush c) Lifting d) Wet onto dry 10. During which historical period did watercolor painting begin to be used broadly as a unique and viable medium, rather than just for botanical studies and travel journals? a) The late 1950's b) Renaissance c) Early Paleolithic age d) The 18th century
If you enjoyed this lesson, you may also like my other art lessons HERE.
Don't forget to follow me on Instagram!
This watercolor lesson plan is free to use and download for all educational purposes. You may not sell the content or use it for commercial purposes.
0 Comments
Your comment will be posted after it is approved.
Leave a Reply. |

Bruce and Marla at Garth Brooks Concert!
Author: Bruce BlackWelcome to Artful Academia: Categories
All
Archives
May 2024
|
||

 RSS Feed