Artful Academia
The musings of a landscape painter, art teacher, and art history lover
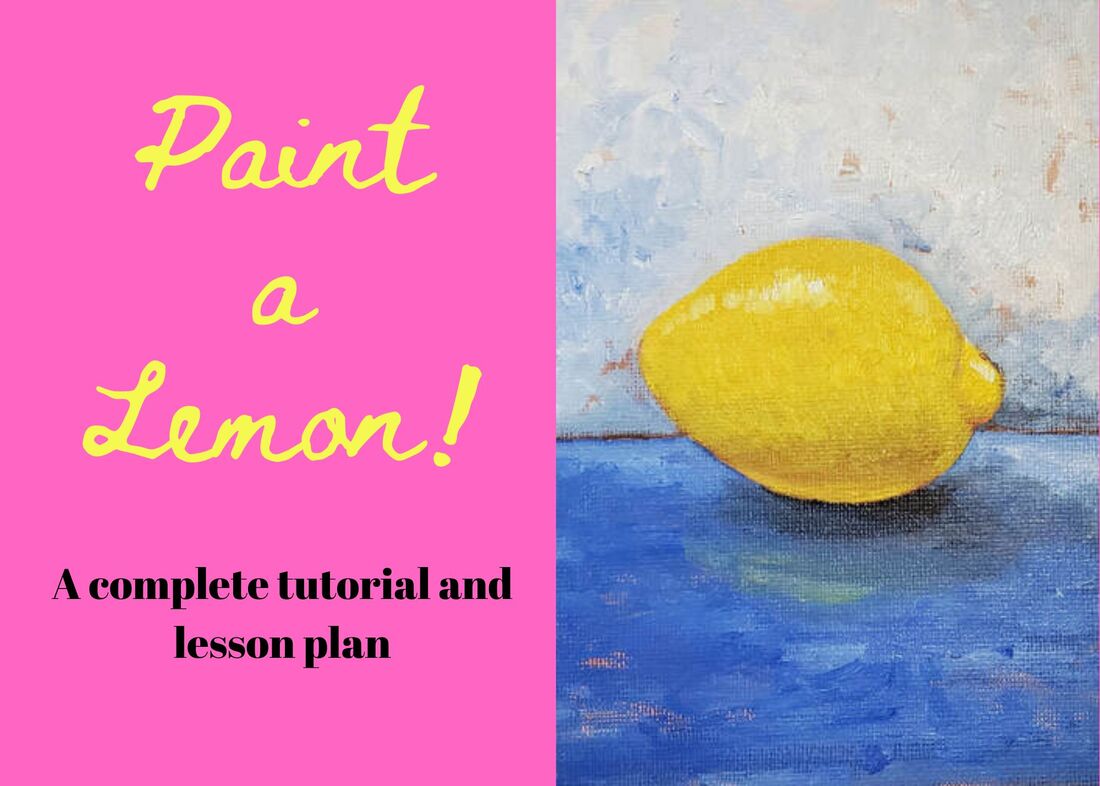 I recently completed this simple beginning painting project with my high school seniors. For this project, I taught my students how to paint using the classical style, starting with an under painting, and then moving on to color. I have chunked this lesson out and made it as simple as possible. All my students were able to achieve surprisingly good results. If you try this lesson, please let me know how you do. This is a complete beginning painting lesson with a step-by-step tutorial. It is intended for beginning painting students and art teachers. There is also a linked PowerPoint presentation at the end. 
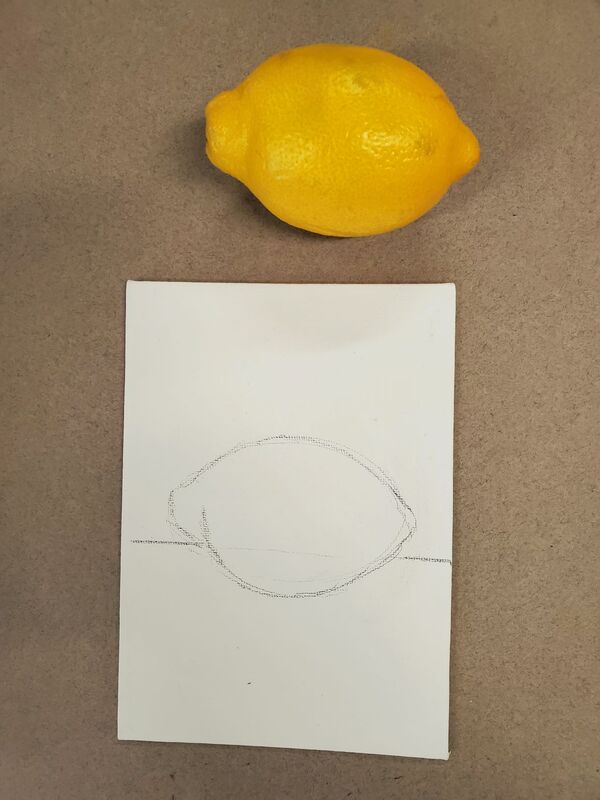
Materials: Small canvas board, 5” X 7” A few brushes suitable for acrylic or oil paints. We used a #4 flat, #3 round, and ¾” flat. Acrylic paint (brown, white, and black) Water mixable oil paints. We used Cobra, Royal Talens, 40ml tubes Optional: true oil paints and odorless mineral spirits. (must have ventilated space – not for young kids!) Pencil One lemon (per student) Cup of water Paper towels Paper plates or mixing trays Step 1: Toning your canvas board
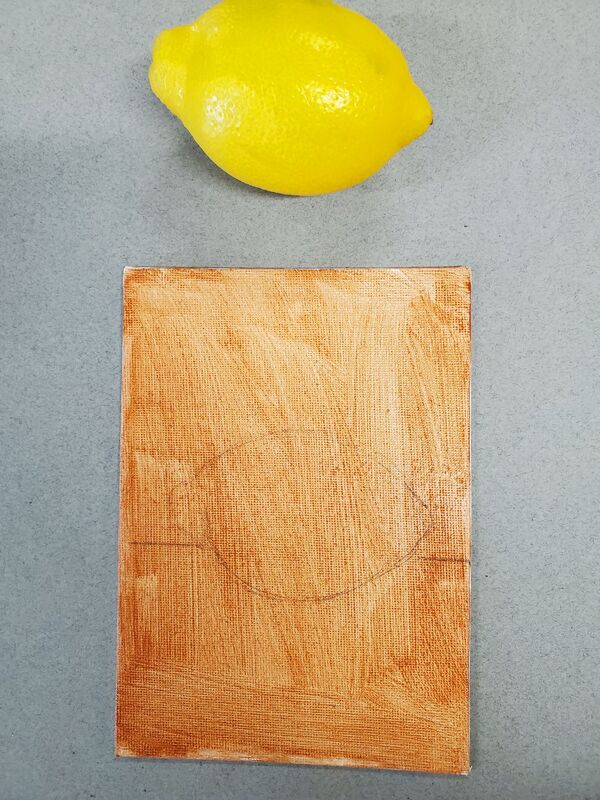
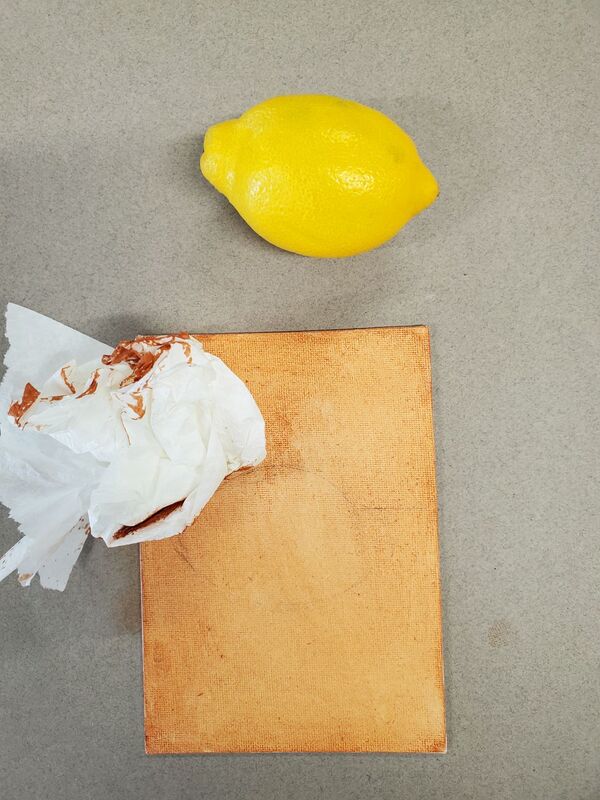
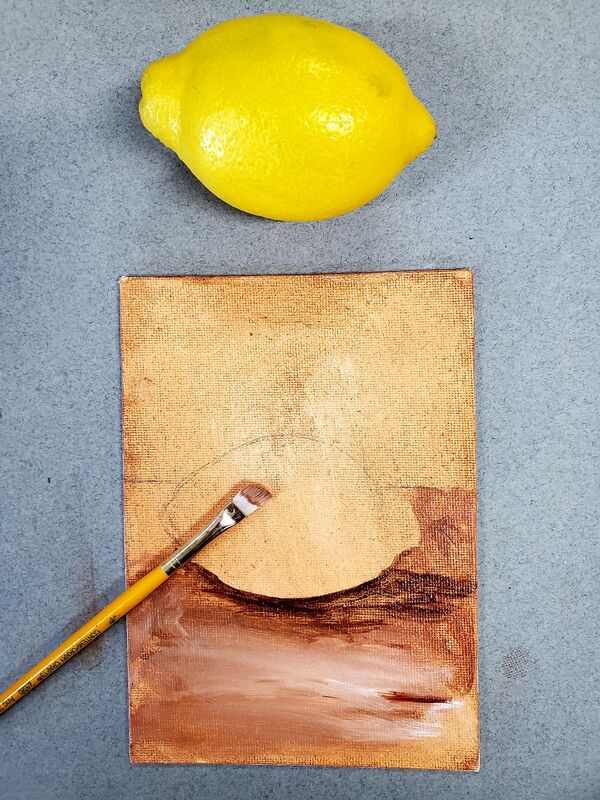
Start out by tracing your lemon in pencil onto your board. You may need to adjust your outline until you get a good lemon shape. Then draw a line behind the lemon to indicate the table and background. Now you are ready to tone the board. It is important to tone the board with a neutral color and medium value. This will assist you as you add darker and lighter values and is easier than beginning with a white canvas. Dip your brush into some water and dampen your canvas board a bit. Then, get some brown acrylic paint and quickly paint your canvas board. The paint should be thin and full of water. Next, use your paper towel to wipe off your canvas board and paint, while it is still wet. This will leave a light brown value similar to stained wood. If you don’t have acrylic paint, you can thin your oil paint and use this same process. We use acrylic paints because they dry a lot quicker and add another layer of protection for your canvas. See using Gesso on canvas HERE. Step 2: Creating an under painting
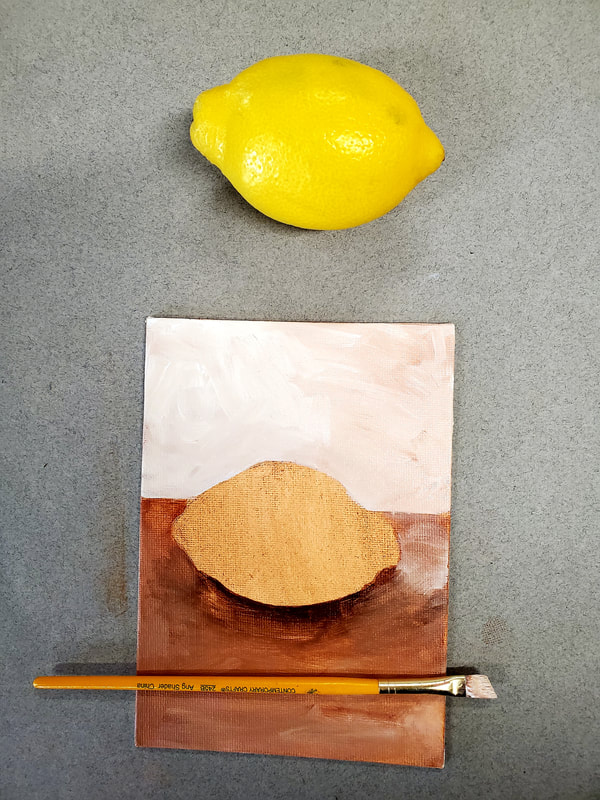
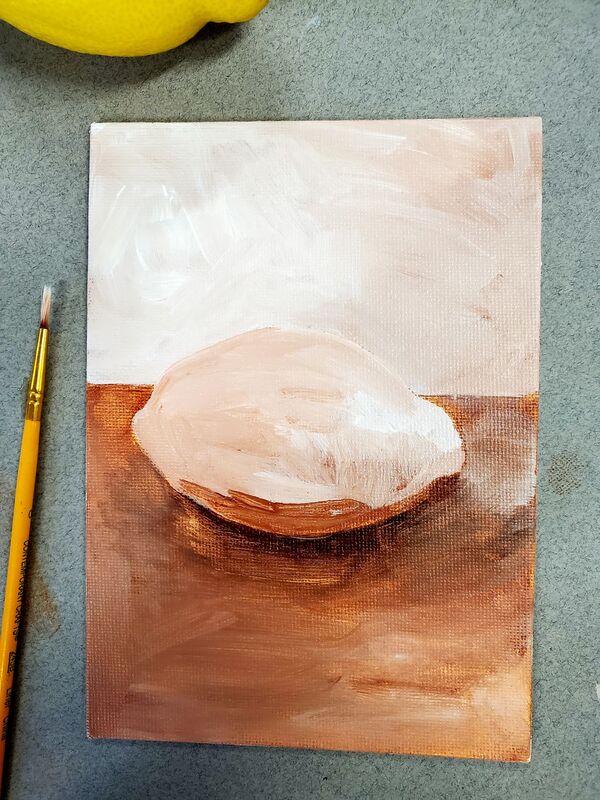
Artists have used under paintings for hundreds of years. The idea is to create a monochromatic painting with thin layers first. The under painting focuses on the values and structure of the painting, rather than the colors. On a paper plate or mixing tray, add a little brown, white and black. Then, set your lemon on your table and examine the way the light moves around the object. You can refer to the image of a sphere to remind yourself about how light and shadow combine to create form. Next, begin lightly painting in your lemon, using combinations of black, brown, and white to establish the form and values. Take your time with this part and work to get your lemon really carved out. It will look a little sloppy at first, but will gradually come into focus. The background should be a light value and the table somewhat dark. Caution: Don’t let your paint build-up at this time. Keep your colors thin. Allow the entire painting to dry before moving on to the next stage. Step 3: Adding color and oil paint to the lemon Once step two is dry, you can begin with step three. On your mixing tray add yellow, white, blue, and red. With oil paint, you want to start with your darker values and lay them in first. The initial layers should be thin. You can use your water to thin the oils. Or, if using traditional oils, thin with mineral spirits. Shadow Color: For the shadow color of the lemon, mix violet and yellow together to get an in-between color. Yellow is across from violet in the color wheel, making it a compliment to violet. Artists mix compliments to create shadow tones and neutral tones. Your shadow should be about 3 parts yellow to 1 part violet. Paint your shadow tone onto the underside of your lemon and keep your color thin. True Color: For the true color, use pure yellow. Start at the top of your lemon and work down to the shadow color you added previously. Then, blend your yellow into the shadow color. Your yellow should be a little thicker than your shadow color. Highlight: Use thick pure titanium white to apply a few spots for highlights at the top of your lemon. Thin to Fat Rule: Oil paints dry slowly, and it is important that the bottom layers dry quicker than the top layers. If the top dries too fast, you will get crackling on your surface. Consider using thinned out paint early on. Then add your medium, with no thinner for your top layers. Or, just use pure paint for the top layers. Also, try to make your top layers with heavier paint than the bottom layers. 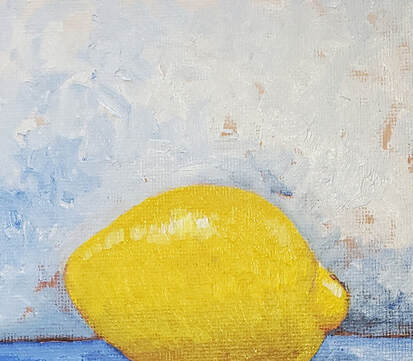
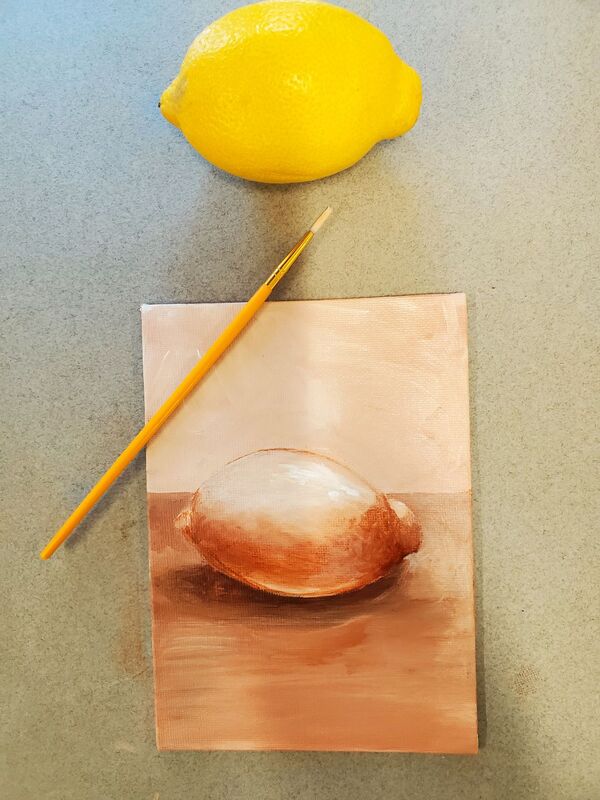
Step 4: Background For the background, mix up some white with a little blue and just dab it around the background area. It is okay to leave some under painting showing, as it creates an interesting texture. Try to make your color a little bluer around the bottom of the background and lighten it as you go up. Your paint can be thick and heavy because this will all go on in one layer. (some students add a little yellow to their white and blue mixture to get a more minty or blue-green color, and that works well also). 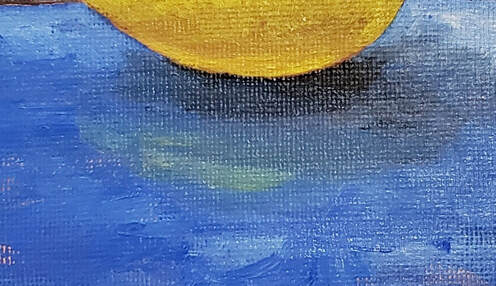 Step 5: Table For the table, mix a rich mixture of pure blue and just a touch of white. First, paint in the cast shadow under the lemon. For the shadow, use pure blue with a little brown added to darken it. Make your shadow with thin paints. Then use your previously mixed blue and white paint to paint in a nice blue table. Try to add a little more white to your paint as you move closer to the bottom. Just like the background, you can be a little messy and leave some under painting showing.  Step 6: Yellow reflection Once you are comfortable with your lemon, background, and table, try adding a little more yellow just below your cast shadow on your table. Mix your yellow with a touch of white and add it in as a reflection of a little yellow onto the table. Free download: Lemon Tutorial PowerPoint. Enjoy!
The nice thing about the color yellow is that it is a very transparent color. That means if you (or your students) do a good job with their under painting, the part done in oil will come out great. The under painting will gently show through the upper layers of color, maintaining a sense of form. That's it! I offer this lesson free to anyone interested in learning about art or teaching art. If you enjoyed this lesson, you may also like this Waterclor Lesson. Good Luck! 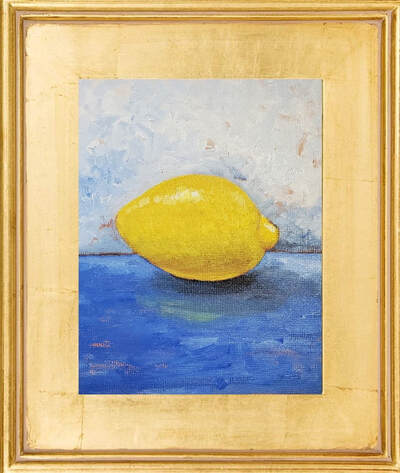
4 Comments
7/27/2023 08:28:46 pm
7/29/2023 07:20:31 am
Thank you so much for those kind words. I am happy to be of service. Your comment will be posted after it is approved.
Leave a Reply. |

Bruce and Marla at Garth Brooks Concert!
Author: Bruce BlackWelcome to Artful Academia: Categories
All
Archives
March 2024
|
||

 RSS Feed